Sharp AR-FX12 Specifications Page 7
- Page / 122
- Table of contents
- BOOKMARKS
- LASER PRINTER OPTIONS 1
- FAX EXPANSION KIT 1
- (For North America) 1
- CONTENTS 2
- [1] PRODUCT OUTLINE 3
- [2] CONFIGURATION 3
- [3] SPECIFICATIONS 4
- H. Transmission system 5
- I. Record size 5
- J. F code communication 5
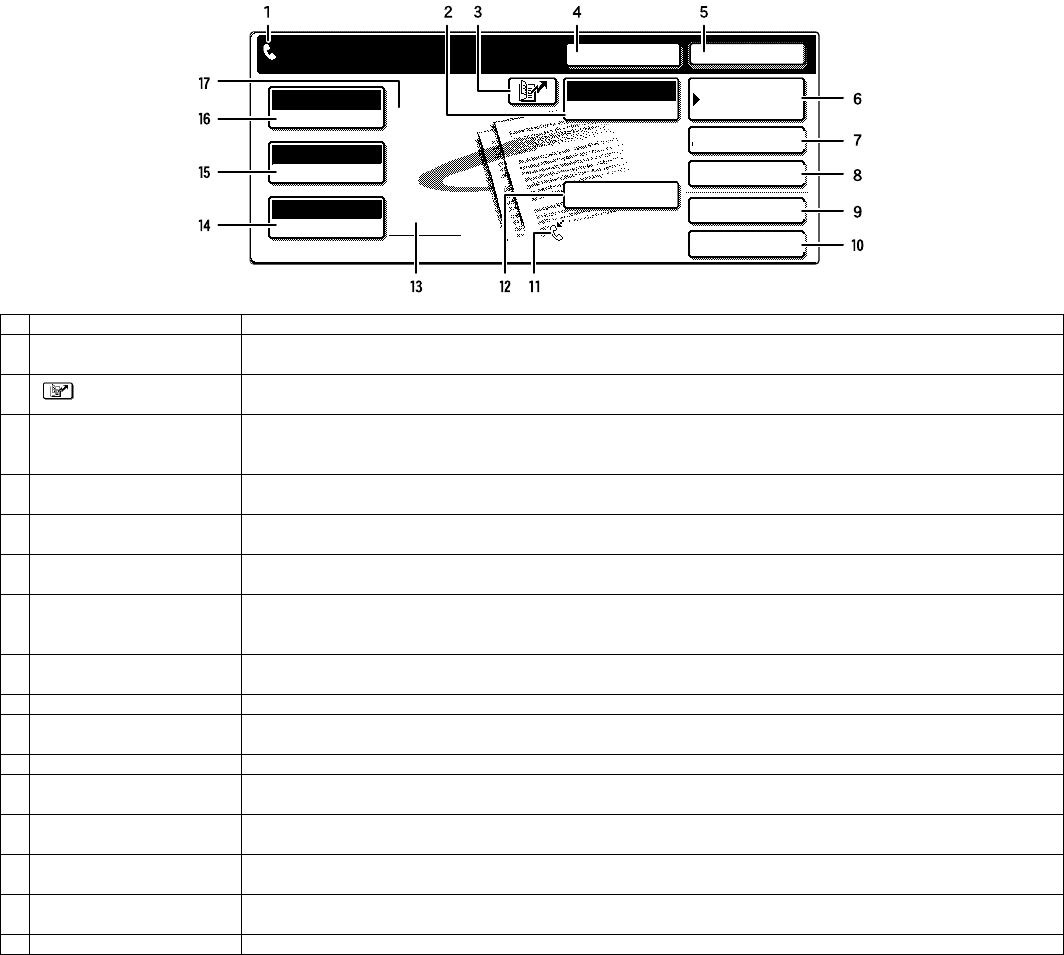
- 1. Operation panel 6
- A. Condition setting screen 7
- Storing or order 8
- (initially selected) 8
- 4. Simulation list 13
- 5. Detail of simulations 16
- 00000000 24
- 10001100 33
- 6. FAX software switch 37
- B. Details 39
- [7] MACHINE OPERATION 65
- A. Original sizes 66
- 3. Own number sending 67
- 4. Quick On-line 67
- 5. Trouble codes 68
- B. Communication report codes 70
- [8] ELECTRICAL SECTION 75
- 2.Actual Wiring Diagram 76
- 3.Circuit Diagram 77
- FAX I/F PWB (2/5) 78
- FAX I/F PWB (3/5) 79
- FAX I/F PWB (4/5) 80
- FAX I/F PWB (5/5) 81
- MDMC PWB (1/8) 82
- MDMC PWB (2/8) 83
- MDMC PWB (3/8) 84
- MDMC PWB (4/8) 85
- MT48LC4M16A2TG-75 86
- MDMC PWB (6/8) 87
- MDMC PWB (7/8) 88
- MDMC PWB (8/8) 89
- TEL/LIU PWB(USA) (1/3) 90
- TEL/LIU PWB(USA) (2/3) 91
- TEL/LIU PWB(USA) (3/3) 92
- 4.Part Layout 93
- B.MDMC PWB_U 94
- C.TEL/LIU PWB_U 96
- PARTS GUIDE 97
- DEFINITION 98
- FAX BOX ユニット (FAX BOX UNIT) 99
- NO. PARTS CODE 101
- DESCRIPTION 101
- 索引 (Index) 114
- PARTS CODE NO 115
- COPYRIGHT 122
- 2004 BY SHARP CORPORATION 122
Related products and manuals for Copiers Sharp AR-FX12
 (121 pages)
(96 pages)
(2 pages)
(89 pages)
(18 pages)
(112 pages)
(66 pages)
(26 pages)
(121 pages)
(96 pages)
(2 pages)
(89 pages)
(18 pages)
(112 pages)
(66 pages)
(26 pages)
 (72 pages)
 (2 pages)
(74 pages)
(12 pages)
(82 pages)
(44 pages)
(107 pages)
(36 pages)
(9 pages)
(170 pages)
(2 pages)
(74 pages)
(12 pages)
(82 pages)
(44 pages)
(107 pages)
(36 pages)
(9 pages)
(170 pages)
© 2020, manymanuals.com. All rights reserved. | 0.821 s |
 Manymanuals.com
 Manymanuals.de
 Manymanuals.fr
 Manymanuals.it
 Manymanuals.pl
 Manymanuals.cz
 Manymanuals.es
 Manymanuals-pt.com
Comments to this Manuals